Mastering Stitch Increases: M1, KFB, and YO
One of the most powerful tools in knitting is the use of stitch increases. These techniques let you grow the number of stitches in your project, giving your knitting shape, flow, and sometimes even decorative flair.
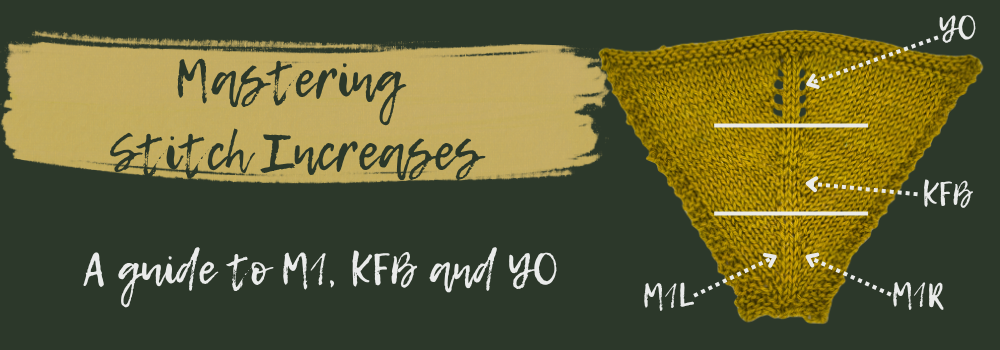
In this guide, we’ll focus on three fundamental increases: M1, KFB, and YO.
If you’ve ever wondered how patterns achieve shaping at the waist, how lace shawls create their beautiful eyelets, or how designers sculpt sleeves and necklines – it’s all about increases and decreases. In this guide, we’ll look closely at four fundamental increase techniques every knitter should know:
🧶Make 1 (M1)
🧶Knit into Front & Back (KFB)
🧶Yarn Over (YO) or Yarn Forward (YF)
Each has its own strengths and quirks. By the end of this blog, you’ll not only understand how to do them, but when and why to use them.
📹 And to make things even easier, we’ve created a step-by-step video tutorials for each of these stitches so you can follow along at your own pace.

Why Learn Multiple Stitch Increases?
You might be wondering – do I really need to learn more than one way of increasing stitches? The answer is a resounding yes! Each increase technique looks different, behaves differently in fabric, and suits different projects.
For example:
- Make 1 (M1) gives you a neat, almost invisible increase.
- KFB is quick and sturdy but leaves a small bump - itself often and element of the design/
- Yarn Over (YO), sometimes known as Yarn Forward (YF) in UK patterns, deliberately creates a hole – perfect for lace.
Once you can confidently use these techniques, you’ll unlock a whole new world of patterns and be able to adapt designs to your own style.
1. Make 1 (![]() M1): Subtle and Seamless
M1): Subtle and Seamless
The Make 1 increase is a workhorse in many modern patterns. It’s created by lifting the strand of yarn (the "bar") that runs between two stitches on your left and right needles, and knitting into it. This creates a brand-new stitch without leaving a noticeable hole.
There are two main versions:
- M1L (make one left) – the new stitch leans left.
- M1R (make one right) – the new stitch leans right.
There are also equivalent versions for the purl side of your work (M1LP and M1RP).
👚 Designers love using M1 for shaping because it’s neat and blends into the fabric. You’ll often find it in sweaters, hats, and socks where a smooth, almost invisible increase is ideal.
💡The rest of us love using it because we can invisibly add in a stitch when we realize our stitch count is one out!

The detailed explanation is:
|
Right Side |
M1R: insert left needle under the bar between the last and next stitch from back to front, then knit into the front leg of that stitch. M1L: Left slanting Increase: insert left needle under the bar between the last and next stitch from front to back, then Knit into the back leg of that stitch. |
| Wrong Side Increase: |
M1Rp: insert left needle under the bar between the last and next stitch from front to back, then purl into the back leg of that stitch. |
✨ Tip: Be careful not to pull the strand too tight when you lift it – that can make the new stitch difficult to knit.
🎥 Watch our Make 1 video tutorial →
2. Knit into Front and Back (KFB): Simple and Reliable
The Knit into Front and Back (KFB) is often the first increase knitters learn, and probably the most common increase in patterns.. To make it, you knit into the front loop of a stitch as usual, but don’t slip it off the needle. Instead, you knit into the back loop as well, creating two stitches from one.
The KFB leaves a small horizontal “purl bump” where the increase occurs. While it’s not as seamless as M1, that little bump can add charm, especially in textured designs or children’s knits.
✨ When to use it:
- Great for beginner projects.
- Perfect when you want sturdy shaping in areas like hats, dishcloths, or scarves.
- Works well when the “bump” is part of the design feature.
🎥 See how to do KFB in our video →
3. Yarn Over (YO): Decorative and Lacy
If you’ve ever admired the delicate holes in lace shawls, airy scarves, or summer tops, you’ve already seen the Yarn Over (YO) at work. A YO is made simply by wrapping the yarn over the right-hand needle before knitting the next stitch. This adds a new stitch and creates an intentional decorative hole.
The magic happens when you pair YO with decreases like k2tog (knit two together) or ssk (slip, slip, knit). The decreases balance out the extra stitches while the yarn overs leave behind their signature eyelets.
You can see an example here of an increase/decrease in our Random Eyelet Shawl --->
✨ When to use it:
- Lace shawls and stoles.
- Eyelet patterns in scarves, jumpers, or baby clothes.
- Decorative detail in otherwise plain knitting.
🎥 See our Yarn Over video tutorial →

Choosing the Right Technique
Each increase creates a different look. Here’s a quick guide to help you choose the best one for your project. So how do you decide which increase (or decrease) to use in your project?Generally, the pattern will tell you which increase stitch to use, but if it does not, or you are designing something for yourself, here’s a quick guide:
- Need subtle shaping? Use M1.
- Looking for easy and reliable? Try KFB.
- Want decorative holes? Go for YO.
- Balancing lace with structure? Add CDD.
Understanding these differences means you’ll start to look at your knitting with a designer’s eye. Instead of just following instructions, you’ll know why a pattern calls for a certain increase – and you’ll feel confident substituting if you prefer a different effect.

Frequently Asked Questions
Q: What’s the easiest increase for beginners?
A: Most knitters find KFB the easiest to learn because it’s just knitting into the same stitch twice.
Q: How do I avoid holes with Make 1?
A: Make sure you twist the bar when you lift it onto the needle.
Q: Is Yarn Over always an increase?
A: Yes! YO always adds a stitch. In lace, decreases balance it out so your stitch count stays the same.
Q: Can I substitute one increase for another?
A: Often yes, but be mindful of the look. Swatch first – a KFB bump will look different from a neat M1.
And if you’d like to try these increases in real projects, our Knitting Kits Collection is the perfect place to start. Each kit includes beautiful alpaca yarns sourced from trusted British and Irish farms, plus clear patterns to help you grow your skills.
Final Thoughts
Stitch increases and decreases are the backbone of knitting design. From shaping sleeves to building lace patterns, from subtle invisibility to bold decorative lines, mastering these four techniques – M1, KFB and YO (YF) – will open up endless possibilities in your knitting journey.
And remember, every increase is more than just an extra stitch. It’s a step towards new skills, new projects, and new creative confidence.
So pick up your needles, practise with our videos, and see how these simple techniques can transform your knitting 😀
💡Made a mistake in your work? check out our blog on quick fixes
